Set-Up Documentation for Playstation VR
- Former user (Deleted)
This documentation is useful for anyone who needs to set-up their Playstation VR hardware. It is also useful for anyone troubleshooting their hardware and/or software such as the Littlstar VR Cinema app for Playstation VR.
I. Minimum Requirements for Playstation VR:
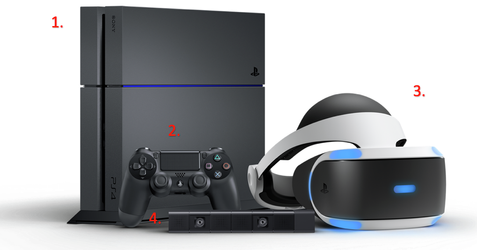
- Playstation 4 console (and all associated cables)
- Dualshock 4 controller
- Playstation VR Headset and components (and all associated cables)
- Playstation Camera
- Stable internet connection*
- Minimum required connection speed: 7mbps
- Recommended connection speed: 15mbps
- Television/Display
* Note: Although it may be possible to run the Littlstar VR Cinema app with slower internet speeds, your experience will vary and will likely not be on par with the company’s intended user experience.
** These recommendations may change over time
II. Setting Up Your Playstation VR:
To set up your Playstation VR, follow these simple step by step instructions made by IGN:
http://www.ign.com/wikis/playstation-4/How_To_Set_Up_PlayStation_VR
1. Turn off your Television and PlayStation 4 console. Identify the Processor Unit (the square black box-like unit).
Note the slide cover on the front of the Processor Unit. Slide the cover until the ports are visible. Select the included HDMI cable
2. Plug one end of the HDMi cable into the back of your PS4
3. Plug the other end of your HDMI cable into the "HDMI PS4" input on the back of the Processor Unit.
4. Now, connect the PSVR Processor Unit HDMI cable to your TV.
5. Locate the included USB cable. Plug the small end of the USB cable into the Processor Unit. Plug the other end of the USB cable into a USB port on the PS4.
6. Find the included AC power unit. Plug the AC unit into the Processor Unit. Plug the other end of the AC adapter into a power outlet
7. Find the VR Headset Connection Cable. Plug the VR Headset Connection Cable into the front of the Processor Unit. Match the symbols to get the correct orientation.
8. Plug the VR Headset into the other end of the Connection Cable. Match the symbols to get the correct orientation
9. Power on the TV, then power on the PS4..
Press the Playstation power button on the Inline Remote
Configuring Playstation Camera
1. Turn off the television and PS4. Attach the Playstation Camera cable to the AUX port on the back of your PS4.
2. Place the Playstation Camera atop or immediately above your TV. Make sure no obstructions block either camera's view of the room
3. Power on your PS4
Positioning the Camera
Your PSVR camera should be above your TV, angled in such a way that it ha a clear field of view with your head in the center. Distance from the camera can vary but keeping it at least a couple of feet away works best.
The camera should be centered on you.
Configuring the Play Area
"The recommended play space measures approximately 10 feet by 10 feet total, with the user in VR sitting about 5 feet in front of the Playstation Camera / TV. Clear an area larger than the Play Area of all obstacles before using PS VR, and make sure that no walls, furniture, or objects can impede your VR play space."
Configuring the Camera View
1. After connecting your PSVR headset, you'll need to configure your Playstation Camera and make sure everything is working properly.
2. First, respond to the setup prompt.
3. Now, read the health and warning info.
4. Position yourself and the camera so that your head is centered in the square onscreen.
5. This represents a good position.
6. Now follow the prompts to position the headset. Adjust the position until the headset is properly centered over your head.
* Note: Don't forget to gently remove the two lens cover sheets inside the PSVR helmet
III. How to Find and Download the Littlstar VR Cinema App
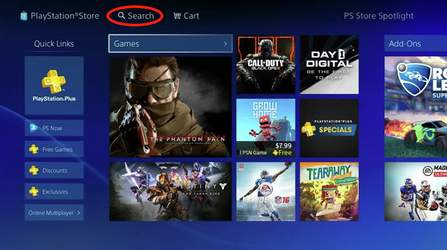
1. Once you have set up your Playstation VR set up, go to the Playstation home screen and look for the Playstation Store button and select it

2. In the Playstation Store, tap on the search icon and type in “Littlstar”, then select and download the Littlstar VR Cinema App to your PS4
3. Now, go back to the Playstation home screen and select the “Littlstar VR Cinema” app to open it
IV. How to Use the Littlstar VR Cinema App for Playstation VR
Once you have started the app (either via your PC or headset), you should see the Littlstar home screen. Here are a few things to keep an eye out for:
1. By looking down, you will get a larger view of the digital playstation controller, which will be outlining what each button will do
- As an overview, you will be navigating using either the controller’s directional pad and/or the left analog stick
- You will use the X button to make selections
- Use the O button to go back as well as to bring up the app menu
2. To watch a video, just select it using the X button
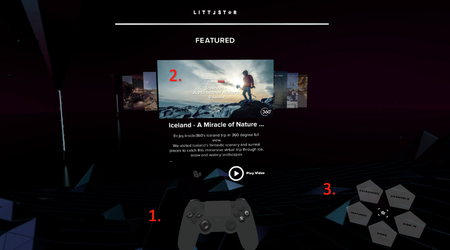
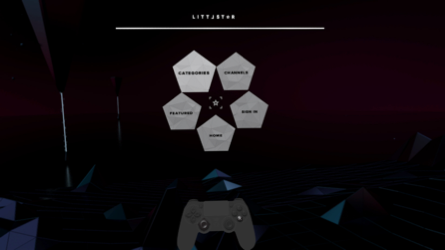
3. While on the Littlstar home/featured page, you’ll notice the Littlstar menu on the bottom right. Press O to bring up the menu. Here, you’ll notice a subset of options, including:
a. Categories = select to browse videos by category (ex: sports, music, etc.)
b. Featured = these are hand-picked videos selected by Littlstar
c. Channels = select to browse videos by channel (ex: Disney, RYOT, etc.)
d. Sign in = select this to sign into your Littlstar account or create one
e. Home = select this to go back to the Littlstar home screen
IV. Watching Videos on Littlstar VR Cinema on Playstation VR
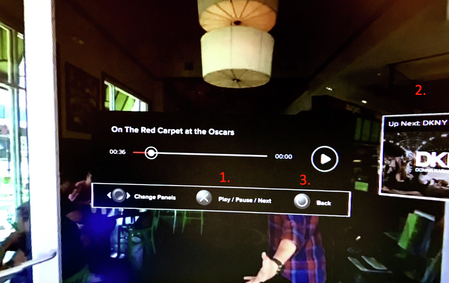
While watching a video, you can bring up the Heads Up Display (HUD) by pressing the X button, this will allow you to:
- Play/Pause the video
- Go to the next video
- Go back to previous screen